Posts Tagged ‘Product Development’

h1

The Triangle of Requirements

March 18, 2009
The Triangle of Requirements

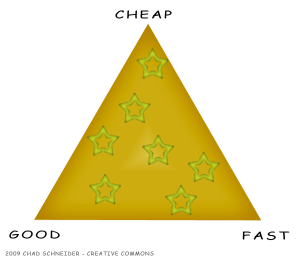
The Triangle of Requirements - A single star represents your project. You can move a star around the gradients to balance your needs, sacrificing one for the other two.

“You can get something good, cheap, or fast. Pick two.”

I’ve heard it many times, but what is it about? I’ve found that it comes down to planning. I come across this “principal” whenever I’m trying to rush a prototype or speed along a vendor. If I want a fast job done right, I’m either going to have to pay up to get extra resources on the job, or I’m going to have to wait for the assigned resources to do their due diligence for me. I don’t want a machinist to rush through my drawing only to miss a critical dimension or misunderstand a callout. My rushed order then becomes a significant delay.

So what can you do to balance this best? By planning ahead, keeping a constant eye on the critical path items that control the minimum schedule, we can improve our schedule, reduce our costs, and create the best quality. We can have the optimum resources available when we need them most – we can line up inexpensive resources to perform menial tasks and skilled, costly resources do only what they are best at. We can order long lead-time items well ahead so there’s no need to pay extra to rush the order. We can identify any high-risk unknowns and attack those first so later tasks are more predictable, more likely to stay on schedule.

I’ve also seen this quote, on the desk of an overworked secretary, “Your lack of planning does not justify my emergency.” It’s easy to get caught up in the firedrill of the day or the long list of design tweaks that need to be in the next prototype. However, it’s a good idea to lift your head and take a look at the project from the high-level perspective to help prevent rounding a bend only to find another emergency.

h1

Unknown Stakeholders

March 5, 2009

RemotesAre you overlooking someone in your user research?

It may not have the romance of flowers or diamonds, but a good universal remote control can do good things for a gadget-lover’s marriage. Before we got a high quality universal remote, there were remotes all over and a page of instructions for guests. My wife grew to understand it, but she hated that I’d complicated such a simple task as watching a movie. More often than not, she’d just turn the TV on by hand and listen to it through the native speakers. Now, she just hits the DVD button on the remote and everything turns on (well, most of the time!) so she can watch a show in 5.1 Dolby Digital surround even if she doesn’t care much about it.

So, if you were writing the product specification for a universal remote control, would you have thought to include your user’s significant others, house guests, and friends? You would surely have included the owners of home theater systems as a significant stakeholder in the design. They want equipment with a ton of features, high performance, and customization. Unfortunately, those requirements might not be as well accepted by the rest of the household if the system is difficult to use. Could you have unknown stakeholders that are preventing a purchase? Should they even be your primary target for the user interface?

Are there stakeholders that have been ignored during the design of your product? Are they holding back the success of your product? How do you find them?

h1

Notes from “Plug into the SmartGrid”

February 17, 2009
Andy Karsner

Andy Karsner - Policy Panel

Washington, DC Feb 17, 2009 –  Every seat in the auditorium at Google’s DC office was filled with people passionate about bringing about change in the way power is distributed. People even lined the back wall and the overflow room. A total of 500 people in attendance. The event format was split into two industry panels, the first discussing the technology requirements for a SmartGrid and the second focused more on the Federal and State policy initiatives required to properly implement such a sweeping technological plan.

Tomorrow afternoon, the ~2-1/2 hour video footage of the panels will be available on both Google’s DotOrg channel as well as GE’s YouTube channel. If you don’t have time to watch, here are my notes from the event. I’m sure I missed some details, so please correct me or submit your comments.

Read the rest of this entry ?

h1

Strive for a simple design

February 4, 2009

There are a lot of ways to solve a problem, but it seems like many of them are more complicated than they need to be. You start by satisfying one design criteria. Then you tackle the rest of them, one-by-one, until the problem is completed. Unfortunately, you may end up with a Frankenstein product that’s difficult to use and ugly.

The best design, the one to strive for, is the simplest one. This is the one where everything fits together and works. It’s easy to use and elegant. It makes you hit your head and say, “Why didn’t I think of that?!” As an engineer, I’m impressed by simplicity just because it is so hard to achieve. I’m always considering it as the ideal solution, something to aspire to.

chessyoutriggers

Homegrown outriggers - CAD rendering

“Good design is as little design as possible.
Less but better – because it concentrates on the essential aspects, and the products are not burdened with inessentials. Back to purity, back to simplicity!”
– Dieter Rams

“Everything should be as simple as possible, but not simpler!”
– Albert Einstein

I am usually found within the electro-mechanical device sphere, but I can appreciate good design principles wherever they happen to show up. I keep thinking about something I saw while fishing for Rockfish on the Chesapeake Bay last Spring. I can’t find anything online about it, so I thought I’d share. I’m not a fisherman, so you’ll have to excuse any incorrect terminology. I had seen fishing outriggers that were long rigid poles that stick out from the boat sides and the fishing line attached along the length, like these. They keep the lines wider apart so you can have more lines in the water without tangling.

On this boat, though, they had outriggers that were a couple of wood planks mounted together with threaded rod. A line is attached to the eye-bolt at the front and it’s dropped off the boat. As the boat drags it, the water rushes past the planks and forces the outrigger away from the boat until the angle, rushing water, and mainline reach an equilibrium. Attach your fishing lines to the mainline using shower-curtain hoops. When a fish bites and drags the line, it breaks free of the hoop. It’s as simple as can be, and you can build a pair for around $50, I’d guess. After-market outriggers go for $500 and up, plus there’s professional installation and maintenance.

I’m not all that impressed by “cheap and dirty” solutions, even when I use them myself. For the most part, they’re just enough to get by when you can’t come up with the right solution. However, even though these are inexpensive outriggers, they’re also easy to install, can reach out 50′ to 100′ off the boat without any modifications, and don’t raise your height into the local bridges. They might be better than the “real thing”!

picture-011

Photo credit: Alex Flamm

Unfortunately, I didn’t think to get a picture of the setup, so I created a CAD model from memory. It may need a bit of tweaking to work properly. I’m guessing the 2″ x 12″ boards are 36″ long, and it’s about as wide assembled. Remember to use stainless hardware and boards that float.

I’m interested to hear if anyone knows the origin of these things or how well they really stack-up against mounted outriggers. All of the other boats in the marina seemed to have them, but maybe it’s just a local thing.

h1

Brainstorming technique

January 12, 2009

plasma_ball

Brainstorming is a great way to identify new concepts and “unstick” a design. There are a variety of techniques, but the secret to any good session is organization. A well-organized brainstorming session can generate lots of great ideas – more than you often need – reducing your need to slip in the shower and hit your head to have a lightning-strike epiphany. Here is a general guideline to brainstorming that should help you avoid unnecessary head trauma.

Step 0 – Understand the ground rules

  1. Turn off the filters. No ideas are stupid. Voting indicates popularity but not how well an idea will work in the product.
  2. Release idea ownership. Once you’ve announced an idea, the group owns it. This goes for everyone. It may be brilliant, it may be stupid, but it’s not yours. Don’t consider it as a solution unless it has value.
  3. As the designer and host, you’re collecting ideas. You’re not beholden to use ANY of the ideas generated at this session. You might use an amalgamation of 5 ideas in the end. Don’t try to work out the solution during the brainstorming session.
  4. If participants don’t follow the rules, you need to moderate the session. Reiterate the rules. Keep the session on track to get the most out of it.

Step 1 – Create the guest list

The act of brainstorming can involve a group of people or just yourself.  Having more people often provides MORE ideas, but not necessarily better ideas, and not necessarily better value. Remember, people are being paid to be at your session and not performing other work. Consider the value of each member of the group when creating the list of attendees.

Ideally, you want a group diverse in experience and expertise. If you’re really limited to yourself, some of these techniques can be helpful, but a small group of about 4-6 people is preferable. You want to have 1-3 people that have been involved in the project, either intimately or peripherally, but you also want to bring a few people that don’t know much, if anything, about it – sometimes called “fresh faces” or “cold bodies”. These people often bring the most value because they have the broadest starting point. However, they need to have expertise you can use.

Step 2 – Break down the problem

The most common error when holding a brainstorming session is that everyone sits down and tries to solve the whole problem. Don’t tackle it all at once. The primary problem needs to be broken down into sub-components. For example, instead of asking the question, “What is the best paper clip design?” focus on smaller components of the problem and integrate the results later.

  1. “What are different ways to attach any two items together?”
  2. “What are some reasons papers need to be attached?”
  3. “What are some current ways to attach paper?”
  4. “What are the problems with these current paper-attaching techniques?

As the host, develop these questions ahead of time, but do not reveal them to the participants. You need a plan to guide the session. Plan to spend about 15 minutes per question, so consider how long the session should last. Remain flexible. Feel free to change or replace questions during the session based on ideas from the group. Impromptu questions may turn out to be more useful.

Step 3 – Get the party started

Give participants the minimum amount of background to be useful. You want to avoid tainting them with everything you know because you might get them stuck, too. You’ll reveal a question, and each participant will spend three minutes individually thinking of all possible answers. This is the time when no answer is shot down. Absolutely none. Seriously. Turn off the filters.

We usually write down each answer on its own post-it note to be stuck on the wall to compile answers. To make everything legible, you’ll want thick markers and large post-it notes, maybe 4″x 4″. Finally, you’ll need stickers as a voting means – approximately 5 stickers per person per question.

Go around the table. Each person offers only one note at a time. Others can turn in similar notes at the same time and discuss clarification or expansion of the thought. Limit discussion if necessary. As the host, you’re only collecting ideas. Don’t try to design the solution now. Participants can continue to write down ideas if anything strikes them, particularly as other thoughts are proffered. The filters are still off. Don’t allow anyone to shoot down an idea.

Once all of the notes are collected, organize the notes into whatever groups might be applicable. Have everyone come up and vote on their favorite ideas. Now the filters come back on. Ideas will be inappropriate or just plain fantastic. Release ownership! People often think their ideas are the best. They’re not. Encourage participants to be objective. Everyone gets 5 votes to put anywhere they want. They can put all 5 votes on one idea if they want.

Move on to the next question. Create new questions if it’s appropriate. Mind the time. This is a high-stress activity. One hour is a decent length session. Bring snacks if it’s going to be longer, and allow for breaks.

Step 4 – Tally the results

Use the voted ranking as a guide. As the designer, you did not reveal everything about the project to the group. They won’t know all the constraints. You might find the top 3 ideas don’t fit into your budget or projected manufacturing technique or recycling plan. That’s okay. Keep all of the ideas. In the end, you’re only looking for one.

Step 5 – Go back to your desk

Now is the time to sift through the ideas. Sit back and see what comes. Hopefully, you can look at things differently. You might even have a possible solution to work out. Feel free to congeal a few ideas into one. Feel free to throw it all away and host another session with different people and different questions.

Organized brainstorming can be a powerful design tool. Practice the technique. It works, but it may not work for you as stated. Tweak it as necessary. At Key Tech, we often call on brainstorming even before we’re stuck. It’s a great way to kickoff a project.

What are your favorite brainstorming techniques? What are the best ideas you’ve had as a result of brainstorming?

Photo credit: Willi Heidelbach